https://www.pegasusautoracing.com/productdetails.asp?RecID=4191
So I ordered two more fittings from Summit - Russell 640431 and Fragola 650310, both of which are intended for M10x1.0 DIN/ISO bubble flares. Overnight parts from Tallmadge, Ohio! I was a little disappointed when they arrived. I was pretty confident the Russell fittings would work, but it turns out they are identical to the Earl's dimensionally, and look ugly. I only ordered one of the Fragola fittings, my "plan C" so to speak, and it turns out that's the one I want!
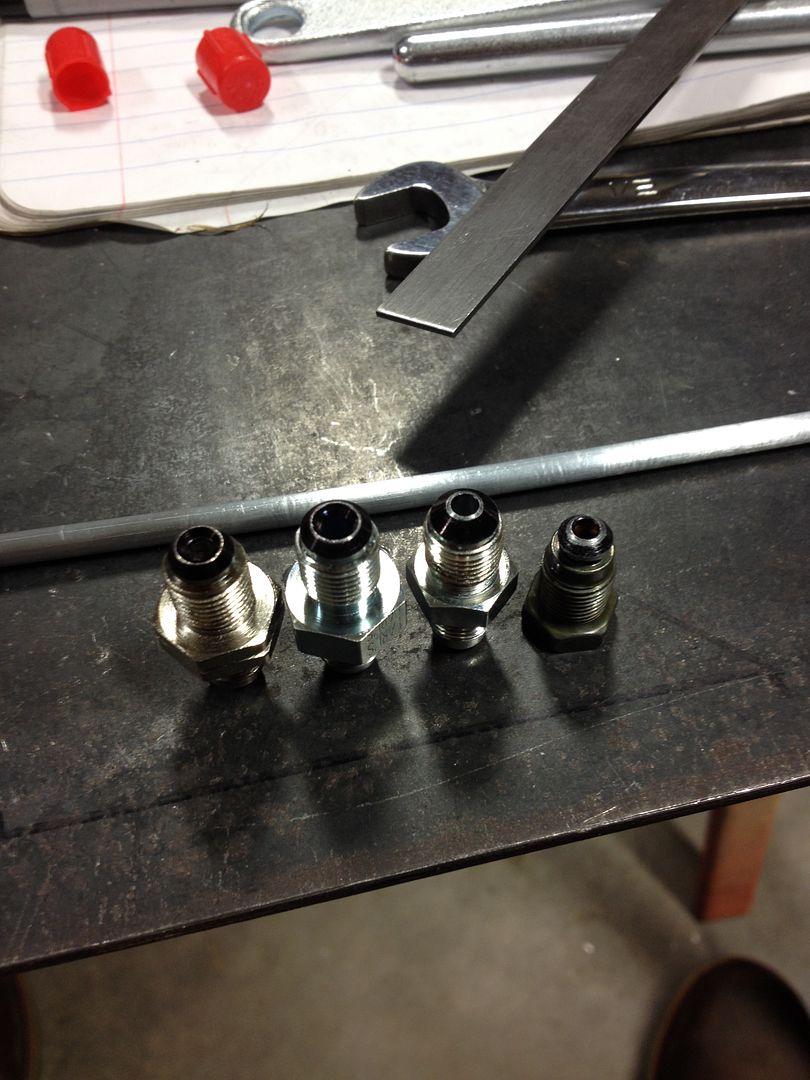
Here are the Russell 640461, Earl's 592032, Fragola 650310, and the OEM bubble flare. The Fragola fitting is clearly the best of the three, but not quite a match to the seal achieved by the OEM flares.
I exchanged a few emails with Greg, the master of hardlines, and he confirmed that the Fragola fittings have provided him with several leak-free VW setups. Problem solved!
https://www.facebook.com/HardlinesBySwoopsFabrications
I bent the rest of the rearward lines, following the OEM routing:

Now here is the tricky part. I have to cut and flare these BEFORE I make the last bend into the proportioning valves.

So I cut a scrap piece to exactly 3", flared it, and bent it to the proper angle. I then transferred this mark to the stainless brake line. I also marked the clock angle of the bend, so it goes straight up into the fitting.

Nailed it.

The second one didn't quite go as smooth! I fucked up the cut a little bit, and ended up making a second cut which made the line about 3/16" too short. I decided to flare and bend it anyway, and I was able to adjust the proportioning valve bracket to make it fit. Two of six brake hardlines complete!

I've had this idea for months (possibly years), and decided that this weekend was the right time to make it happen. I wanted to build a drivetrain cradle that would hold the front and rear crossmembers, along with the engine and trans, so I can install the whole engine assembly using the lift in one shot.
I machined some delrin locating pins that fit in the tooling holes the factory used for this exact same purpose:

Fast forward a few steps, and this is what I came up with. This wooden contraption fits into the tooling holes on the subframes, at the correct angle that matches the lift I'm using, and holds everything in perfect alignment for installation.


I added a few additional locating pins once I got the first 4 in place, and added some thin rubber washers to protect the painted finish.


I bolted on some 330lb swivel casters from Harbor Freight:

Engine in place:

Engine removed!


This will really help prevent scratches and damage during final assembly. The idea of a painted engine swinging from an engine hoist inside a painted engine bay keeps me up at night! Now I can get everything aligned with plumb bobs and strings, and lower the body down over the drivetrain. Eight M12 bolts will bolt everything up in one step!
You haven't sanded the castings on the master cylinder and proportioning valve yet? I am disappoint...
ReplyDeleteThis comment has been removed by a blog administrator.
ReplyDelete